

I'm Maggie, one of the interns (I like to think of myself as the crafty one. Paige is the brains!) here at Bliss Wedding & Event Design. I have been given this month to show you how doable some of these crafts we see on Pinterest are. Lucky me because I'mm ambitious and would like to think that I can do everything I see! But as a recreational crafter, I have limits and some of those crafts we see are done by people who do nothing other than that!
But when it comes to weddings in particular I would have to say that most times, I can only do the same thing about 5 to 9 times before I want to hurt everything mostly because I find the work to become too tedious. At a wedding you have at least 10 tables and well I am reaching my upper limit at that point, BUT that should not scare you away from doing maybe one DIY project! So I am going to show you the good the bad and the ugly from my month of DI[wh]Y projects. Some will look awesome others may not. Keep your eyes peeled for the photo lantern. I am already having nightmares about that one! But today's craft was pretty simple and lost cost. It would be a cute decoration for your wedding.
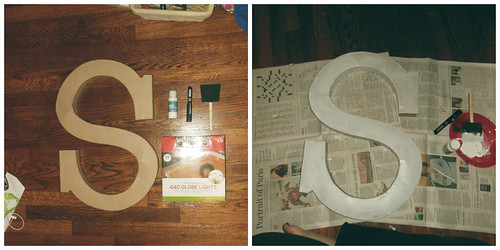
Supplies:
Large Cardboard letter ( I got mine at Joann's)
White paint Globe Christmas tree lights ( LED or Normal, but I saw use LED they get less hot)
X acto knife
1. You will need to paint the letter white and let dry fully.
2. Next you take the X-acto knife and cut out the back, but not to close to the edges. I would say the cut needs to be about two inches wide.
3. This is the tricky step. You will need to space the light blubs and then cutting an X pattern on the painted side of the letter you will mark where all the letters go.
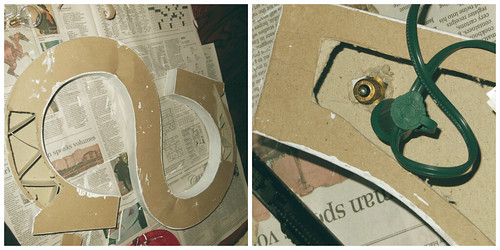
4. after cutting all the X's you will need to push the end of the light bulb thought he middle of the X. Do this for all of them.
5. Then if you have a letter like mine you need to remove the zig zaggy cardboard, so that you can do the next step.
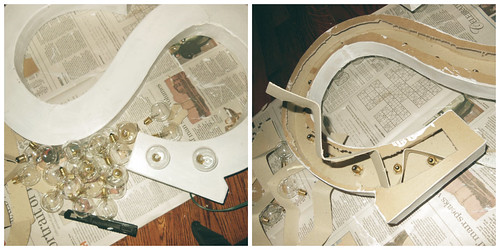
6. Time to reach the light blubs with the cord. This takes some patience and a willingness to fiddle with it. But once you get the first few the rest are as easy as pie!
7. PLUG IT IN!

Very cute and inexpensive was to put your initials up somewhere at the wedding.
Happy Crafting!
xoxo, Maggie


No comments:
Post a Comment